Fabricating silicone customized sumo wheels is a crucial factor to obtain high friction and therefore increase traction, torque and grip.
In sumo battle competitions, it is very important to have good traction with the wheels to achieve a winning high-performance sumobot. Therefore, the best solution is to cast your own tires, to increase optimize them to the maximum.
In this article, I will explain what I learned after two years joining the Spanish National Liga (LNRC) in 2010 and 2011.
In the next pic, you can see my sumo wheels. The 4 tires together give an impressive traction to the 3kg robot!!

Contents
Introduction
The goal of creating your own wheels is to obtain the maximum friction and therefore more traction.
In a sumo battle, all the robots have the same weight, normally 500g or 3kg. In the case of two robots are faced, the robot which has more friction is able to push the opponent outside and consequently win.
How can I increase the overall traction?
The traction is proportional to the friction coefficient and the force to the ground.
F=μ·F_N
F_N = is the normal force that is proportional to the mass of the robot times the gravity (9.8m/s^2)
As all the robots weight the same, we suppose that the normal force on each wheel is also equal.
The μ friction coefficient is determinant to achieve a better traction. So, we can conclude, that the friction coefficient could in some cases determine the winner.

After some research of different materials, I found the urethane rubber a nice and affordable material.
urethane rubber 2020 or similar.
But… how sticky can the wheels be?
The sumo wheels mustn’t be too sticky because it goes against the sumo competition rules. Competitions add in their regulations that each robot have to past a sticky test to certify the participation.
Cleaning the wheels with alcohol is very common between combats. This increase the adherence by removing the dust of the wheels.
Sumo Wheels Fabrication
To make a robot wheels, three parts are necessary to take into account: hubs, rubber and a mold.
1- The Rubber
This is, in my opinion, the key factor. The rubber is the most important decision and sometimes is difficult to choose the rubber and find a distributor.
The main feature of the material to consider is the hardness
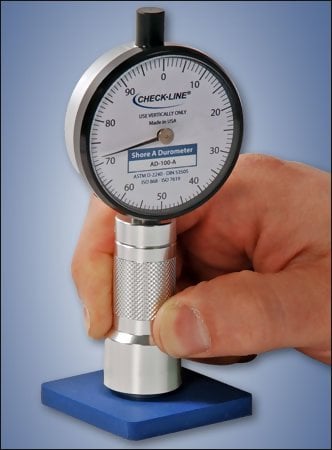
For our application, the rubber needs ShoreA between 20 or 30. If we use less hardness it will be too much sticky and it will wear easily, and if we use more, it will lose friction.
The chosen material is the VytaFlex 20 Urethane Rubber.
Some examples are

If we have time and resources, we can ideally measure the traction of various kind of rubbers and chose the best one. Here you can see how to fabricate a “traction-meter” exert o’meter.

2- The Mold
We can use “any” material with the proper shape for the Mold. I have chosen an aluminium mold to use the same material than the hubs.


The mold could be also from plastic materials, for example the Brooks family autonomus sumobots and friends have made a solid mold of High Density Polyethylene (HDPE), as it can be seen in the picture.

3- The Hubs Wheels
The hub wheels itself have to parts: the aluminium mounting hub and the wheel hub, as it can be seen in the following sketch.

The mounting hubs are attached directly to the motor shaft and inserted inside the wheel hub. They are secured with 2 Allen screws. Therefore, the wheel hubs need to have two holes to insert the Allen wrench.

The tires have been custom manufactured with specific given dimensions to maximise the contact area with the floor.
In my design, front wheel motors mount an encoder, therefore front wheels are narrower than the rear ones. The size specifications of the tires can be seen in the following sketches:


Manufacturing the hubs is perhaps the most difficult or expensive part to fabricate if you don’t have a mechanical workshop with a lathe. You can always send it to a manufacture.

Wheel prototypes
During the Sumo robot development, I needed some prototypes, because the custom hubs and molds took longer than expected.
Meanwhile, I wanted to test some basic functionality of the robot, the motor configuration, chassis dimensions and general mobility. To gain a bit of grip and avoid that it slides on the floor, I wrapped normal balloons around the wheels.
Here leave some photos of the prototypes, there you can see the aluminium mounting hubs (6 mm) from pololu.


Here some picture of the sumo robot prototype with the wood wheels mounted on the structure:

Rubber Casting Process
Once we have all the parts designed and fabricated, we can proceed to create the tires.
First of all, the mold has to be enough lubricated, that you can extract the wheel after the casting process. I have used pure vaseline bought in the pharmacy.
I designed the mold to get a 5 mm wide of rubber.
To centre the wheel, a screw is inserted in the middle.

Some equal sized elements have to be added to the mold, in order to get a concentric wheel, before fixing it

Preparing the Rubber Mix
The material, the VytaFlex 20 Urethane Rubber, come in two bottles labeled as A and B.
Following the instructions… Mix the A and B product with 1:1 in a separated recipient until you get a homogenous mix.
Before this, you must calculate approximately the necessary rubber volume and we divide up into 2 to get the amount of liquid from each bottle.


Afterwards, we leave them about 24 hours to cure. If you are in a hurry, it is possible to take it out from the mold and leave them dry in the air. But this could generate some surface imperfections.

Results
The results are a high-quality sumobot wheel with a lot of friction with the ground.
The wheels adhere to the surface properly without being “sticky”.


Conclusions
Summarizing, to have a nice sumo wheels with high friction:
- Cast your customized wheels maximizing the area of contact
- Fabricate a new tires for each competition to avoid degradation
- Clean the rubber with alcohol after each battle
Do you have some question about the process? Please leave some comment about your experience


