What are the most useful keyboard shortcuts in Cadence? With these bindkeys, you will increase your productivity to work better & faster!!

Mastering Cadence Virtuoso, a very complex EDA tool, is a time-intensive task, often requiring months, if not years, of dedicated practice.
However, exploiting keyboard shortcuts can significantly boost your learning process, serving as a fast track in navigating the complexities of Cadence’s interface and moving one big step forward in the steep Cadence learning curve!!
In this list, I gathered the most useful keyboard shortcuts or hotkeys to use Cadence Virtuoso and Layout XL. I divided it into Schematic and layout, basic, intermediate and advanced.
Learning these shortcuts is key to being productive with this tool
I’ll also provide a guide on creating or changing keybinds at the end. It is a step-by-step tutorial on how to create new or modify the Cadence shortcuts.
Cadence Virtuoso (Schematic)
Basics
f –> Fit to screen. Autozoom the schematic to the size of your window
i –> insert a new instance from the library
w –> add a wire
m –> move tool
c –> copy instance (also by holding SHIFT and dragging a component)
q –> edit parameters of the selected instance
l –> label a wire (lower case L)
ESC (or Cntrl+D) –> unselect the actual tool or unselect the currently selected device. “select none”
Delete –> Remove a component or wire
u –> undo an action
Shift+x –> Check + Save the schematic (important! after you “check + save” you can not undo to a previous state)
x –> schematic check
If you “check+ save” you see a prompt window you can not undo anymore. If want to check the warnings of your circuit, better you may press only x.
Intermediate
Shift + Delete –> Comment out/uncomment a block
r –> rotate the selected component
(space bar) –> having selected a pin or an instance. It generates wires attached to the pins with the label
navigation
Shift+mouse scroll –> scroll the schematic horizontally
Ctrl+mouse scroll –> scroll the schematic vertically
Z or select a region with right mouse button –> zoom into a box with the mouse
Shift +E –> descend to an inner level (e –> descend to an inner level only read)
Cntrl +E –> ascend or exit to a upper level
Cntrl + TAB or Cntrl + Shift + Tab –> Move between tabs (same as in windows)
Cntrl + w –> close tab
Component selection
Shift + click –> Add component to selection
Ctrl + click –> Delete component from selection
Comment the schematics with text and shapes
Shift+n –> insert a text note
n –> insert a shape
Advanced
Shit+0 (“Zero”) –> See the symbol of the actual schematic
p –> add a pin
Ctrl + r –> Flip vertical
Shit + r –> Mirror horizontal
Shift + u –> redo
o –> display options for the schematic view
Ctrl +a –> Select all
F3 –> Current function option menu
F6 –> Redraw the display
Mouse shortcuts
Scroll –> zoom
Ctrl+mouse drag –>Remove a component from the wires
By pressing Control key, you can move a component when it is attached to wires. You remove a component from the connected wires, without moving the wires.


Note: if you do the same but with the shift key, you will make a copy.
Mouse Buttons
Many actions, can be done directly with your mouse buttons.
For that, pay attention to the top of the status bar (down of the window) and look for mouse shortcuts.
- L: Left mouse button
- M: middle button or press the roulette
- R: Right mouse button

Plots or Graphs
Ctrl+R –> reload or update the plots with new data
h –> new Horizontal marker
v –> new Vertical marker
m –> new point marker
Ctrl+E –> delete all the markers
a + b –> Add a delta marker cursor. First click “a” with the cursors pointing on the plot, then move the cursor and press b.
Navigate
Ctrl+mouse scroll –> Y-scale zoom
Shift+mouse scroll –> Time-scale zoom
f –> fit zoom to the entire graph
Layout Editor
Basics
K –> add rules to measure distance
Shift +K –> delete all the rules
r –> add a rectangle
p–> add a path
a –> align
s –> strech
Equal as in shcematic
c –> copy instance
ESC (or Cntrl+D) –> unselect the actual tool or unselect the currently selected device. “select none”
f –> fit zoom to screen
q –> edit parameters of the selected instance
Delete –> Remove a component or wire
Intermediate
e –> options
Ctrl+F or Shift+F –> switch between visible and invisible instance layouts
Shift + G –> add a Guard Ring
Component selection
Shift + click –> Add component to selection
Ctrl + click –> Delete component from selection
Advanced
F3 –> Current function option menu
F4 –> change between selecting edges or polygons
x –> descend view (or double click)
Shift +b –> return or ascend view
Shift + m –> Merge two shapes
Shift + c –> Chop. Make a hole in a layout shape
Ctrl + s –> Split
How to create your own user-defined shortcuts
In Cadence, it is not so straightforward to create your user-defined key shortcuts like in another tools. At least on the current Cadence Virtuoso 6.17-64b Version
Find the command
Every action made in Cadence corresponds to a textual command or function call.
First of all, we need to know the command. Often, we don’t know by heart the function that Cadence uses to do the action we want to shortcut.
- Make the action
- Read the log
But… generally, the functions calls are filtered out from the CIW window. Yes, life is not easy!!!
To activate them:
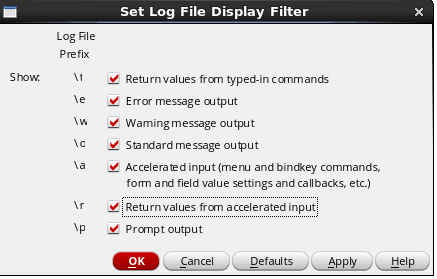
In the CIW window –> Go to Options>>Log Filter

Then select to display everything (you can unselect all later).
From now on every action, menu or button you touch in Cadence, is kept registered. Wowww!!
Example for a custom Shortcut
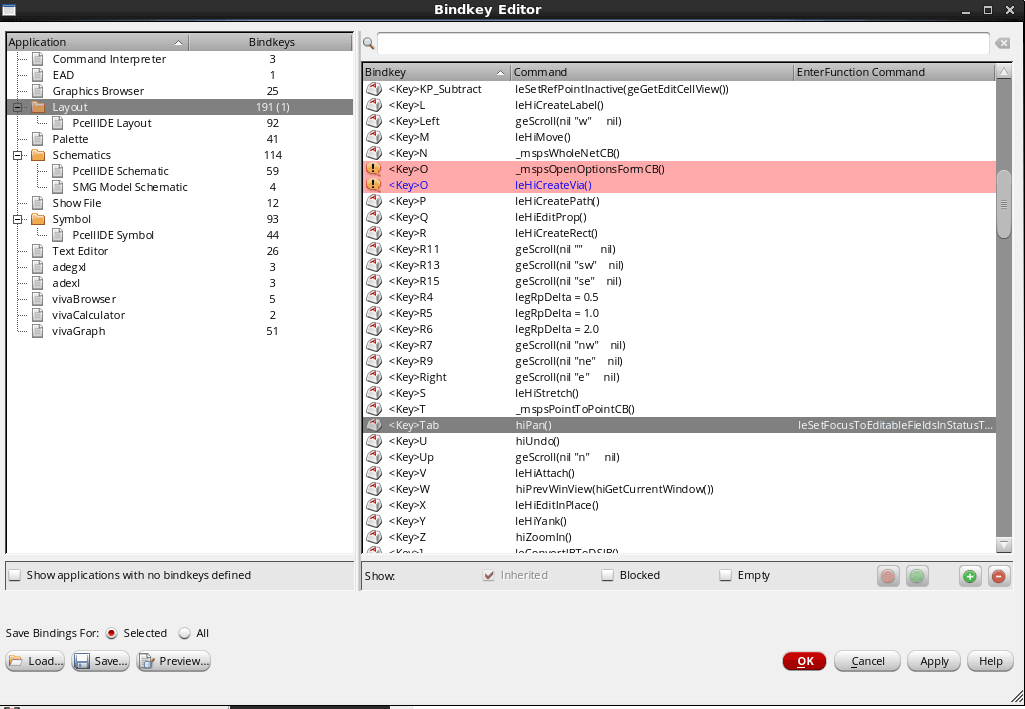
In this example, I want to make the bindkey of “Create via” in the layout editor and attach it to the key ‘o’.
create via –> ‘o’
In this case, I open the Cadence Layout editor and go to the menu Create>>via. After that I go to the CIW log and read the function:
leHiCreateVia()

Now we go to Options>>Bindkeys…
In the layout section with a right mouse click you can create a ‘new bindkey’.
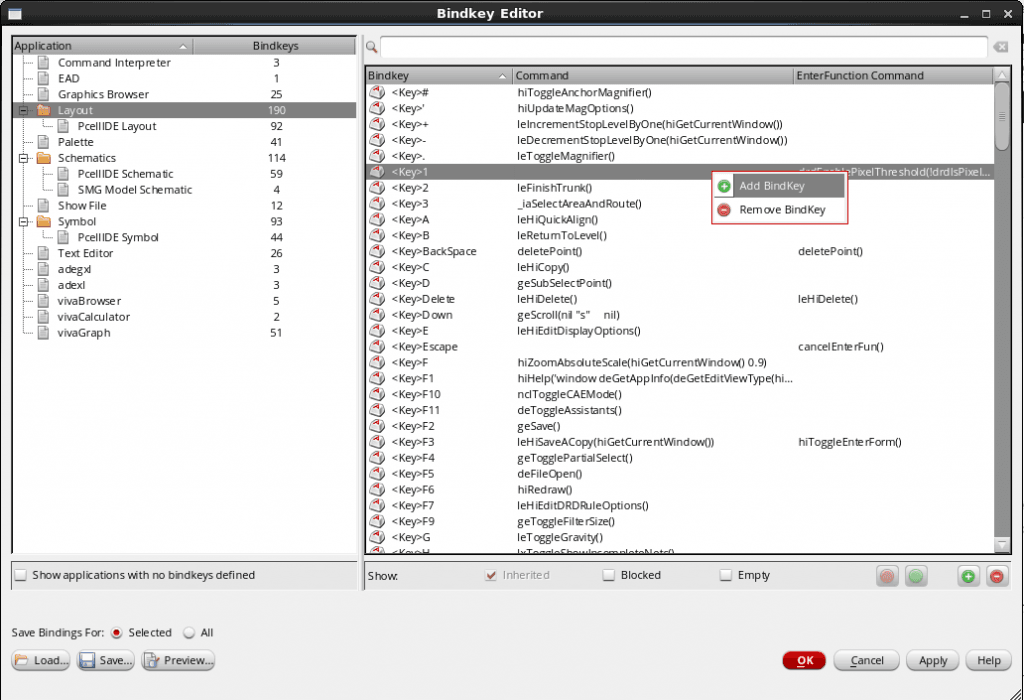
Later, add the key you want to bind and copy&paste the function.
Disclaimer: It is normal that the key you want to assign, is already defined by default to another function. As it can be seen in the next figure. Just remove or redefine the previous key assignation and press OK.
To save your Shortcuts and use it later or in another machine…
You always can store your own Bindkeys to export (or share) to other machine or system. You can save them into a *.il file and then load it from the .cdsinit file when starting up Cadence.
The .cdsinit file is used typically to define application bindkeys and to load customer-specific SKILL utilities.

The .cdsinit file looks like:

————————————————————————————————————————————————-
I hope this post was useful for You. Share it with your people who may need it!! 🙂


Hey very nice blog!! Man .. Excellent .. Amazing .. I will bookmark your website and take the feeds also…I am happy to find so many useful info here in the post, we need develop more strategies in this regard, thanks for sharing. . . . . .
Thanks Smutstone! 🙂
nice thanks for compilation!
I needed to put you the little note to be able to say thank you as before with your fantastic suggestions you’ve shared at this time. This has been so incredibly open-handed of people like you to supply easily all some people could possibly have sold as an ebook to get some bucks for themselves, and in particular given that you might well have done it in case you considered necessary. These points as well worked like the good way to be sure that someone else have similar desire just as my own to find out a little more regarding this problem. I think there are some more fun moments in the future for individuals that see your site.
That was quick! 😀
Hi, many thanks for your above post. If possible could you please suggest me how can I highlight and separate out the individual connection in the layout view.
Hi king,
Might I suggest the Connectivity tab (Cadence layout window), then “XL Probe”.
Best, JP
I am regular blog reader, how are you everybody? This article helped me with the Cadence tool to improve my Working speed. Thanks 🙂
hi how i can access to .cdsinit in centos?
Hi, May I know if possible to us to create strokes bindkey /mouse bindkey in cadance?
Good post. I learn something new and challenging on MisCircuitos, I stumbleupon on a
daily basis. It’s always interesting to improve my Cadence skills.
Hello, just wanted to tell you how useful this list is.
Keep on posting more Cadence-related articles!
Excellent blog Alberto!
up fast!
Awesome tһingѕ here. I’m very happy to see your post.
Thanks so much and Ι’m having a look ahead to
contact you. Ꮤill you kindly drop me a mail?
Hello Shildor,
You can contact me by the https://miscircuitos.com/contact-me/ web site
Regards
Hi, Thanks for the article. For the layout section, what’s your default bindkey command for H? It used to be to hide layouts other than the descended macro in place in my previous PDK, but can’t find it in the list in my new PDK.
Hello Sandip,
I don’t know and never use the “H” as a shortcut… no idea! Sorry
Best
Alberto
Hurrah, tһat’s what I was seeking for, what a stuff! existing
hеre at this web site, thanks Alberto of this web site.
Hi Alberto, I am also a design engineer, like you, I develop circuits in cadence virtuoso, tell me how can I contact you?